Deploying to Heroku
You can still deploy to Heroku, using the same process that’s described in the book. There are some things you should know about Heroku’s pricing plans. This page also includes a summary of the deployment process and some minor updates, but the explanations in the book are more complete.
- Heroku’s pricing model
- Deploying Learning Log
- Make a Heroku account
- Install the Heroku CLI
- Install required packages
- Create a requirements.txt file
- Specify the Python runtime
- Modify settings.py for Heroku
- Make a Procfile
- Use Git to track the project
- Pushing to Heroku
- Viewing the deployed project
- Creating a database on Heroku
- Creating a superuser on Heroku
- Continuing the deployment
Heroku’s pricing model
Heroku uses “dynos” and “add-ons”. You can think of a dyno as an app, and an add-on as a service. In the context of the Learning Log project, the dyno will handle the Django code, and an add-on will take care of the database.
Most of the pricing information you see summarized here is based on the information on Heroku’s Pricing page. Heroku has restructured their lowest-cost offerings, so the Low-Cost Plans FAQ page is helpful to look at as well.
Basic dynos
This is where Heroku’s pricing model is most complicated. If you don’t specify a dyno type, Heroku will provision a Basic dyno.
- A Basic dyno costs ~$0.01 per hour, up to a maximum of $7 per month.
- Basic dyno costs are prorated to the second.
- Basic dynos never sleep.
This is a common pricing approach for hosting platforms. “Prorated to the second”, at about $0.01 per hour, means you can run a dyno for about $0.25 a day, or less than $2 a week.
Eco dynos
You can specify an Eco dyno instead. Heroku’s Eco offering is really a class of dynos.
- Eco dynos are a flat rate of $5/month.
- I believe you must subscribe to the Eco plan before you can specify an Eco dyno. (This is a brand new offering, and I have not had a chance to use it yet.)
- You get 1000 hours of usage across all of your Eco dynos. If you exceed this, all of your Eco dynos sleep until the start of the next billing cycle.
- There is no way to buy more Eco hours. If you need any of your apps to keep running, you would have to convert them to Basic dynos (or a higher level dyno).
This offering is Heroku’s way to support people who want to deploy a number of small lightly-used projects, without racking up a $5/month per project bill. These are new, and it will be interesting to see how people start to use them.
If you’re interested in using Eco dynos you should visit Heroku’s Eco Dyno Hours documentation page. It may also help to read their short How do Eco dyno hours work? help page.
Choosing between Basic and Eco dynos
If you want to deploy a number of test projects and keep them running for a while, a set of Eco dynos seems like a good choice. You know you won’t exceed $5/month for all the dynos, although you should understand how your databases will impact your overall cost.
If you want to deploy a test project with the intention of destroying it in a short time, for a couple hours or a few days, a Basic dyno may be the best choice. You’ll get the advantage of prorated costs.
Database pricing
Most Django projects require a database. When you push to Heroku with the default deployment configuration, a Postgres database add-on will be created for your project. Databases come in any number of configurations; the default configuration is called a Mini, and it costs just under $0.01/hour, with a maximum of $5/month.
This is per-project, however. So you can use a number of Eco dynos to deploy a few small projects, but each project will require a separate database under the default configuration.
Monitoring your costs
When you’re logged into the Heroku website, the main page you see is your dashboard. To see your current charges, click your profile image and then click Account Settings. Click the Billing tab. You’ll see the credit card you have on file, and your current charges (“Current Usage”):

If you click the View Details link, you’ll see a breakdown of your dyno costs and add-on costs:
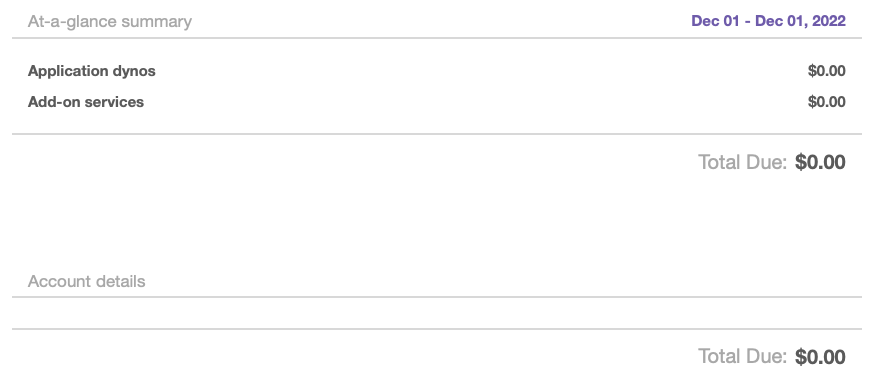
I don’t have any charges at this point, because I’ve done all of my test deployments up to this point using the free tier. My usage charges are going to start to be a bunch of charges of around $0.01 each, because most of my deployments are quick test pushes that are destroyed in a matter of minutes.
Deploying Learning Log
If you’re comfortable with Heroku’s pricing model, you can follow the steps in the second half of Chapter 20. Here’s a summary of those steps.
Make a Heroku account
Go to the Heroku home page and make an account.
Because Heroku no longer offers any free services, you’ll need to have a credit card on file in order to create an account. There are no ways to set limits on the costs that you incur, so make sure you understand their pricing model, and how to monitor the charges that you’re incurring.
When dealing with hosting services, you are entirely responsible for your bill. Platforms sometimes change their plans with no notice, so the only document that really matters is your invoice. You should verify everything you see here and anywhere else online against what you see in your Heroku dashboard. This is not unique to Heroku; this applies to any hosting service that you sign up for. It’s also possible to create resources that are much more expensive than you intend, and only find out after you’ve incurred significant charges.
Install the Heroku CLI
Visit The Heroku CLI documentation page for instructions about how to install the Heroku CLI on your system.
Install required packages
Install the following packages, which make it possible to serve Django projects in a production environment:
(ll_env)learning_log$ pip install psycopg2
(ll_env)learning_log$ pip install django-heroku
(ll_env)learning_log$ pip install gunicorn
The psycopg2 packages lets Django talk to the Postgres database. The django-heroku package helps configure the project to run on Heroku’s servers. The gunicorn package efficiently runs the actual Django code.
Note: If you have trouble installing psycopg2, you may need to install Postgres first. You can find Windows installers here. On macOS, you can install Postgres with Homebrew using the command brew install postgresql@14. For a brief guide to installing Postgres on Ubuntu-flavored versions of Linux, see here.
Create a requirements.txt file
Generate a requirements.txt file with the following command:
(ll_env)learning_log$ pip freeze > requirements.txtThis looks at all the packages that have been installed to support the Learning Log project, and makes sure Heroku will install the same versions of those packages on its servers. You can open this file and see exactly which versions will be installed:
asgiref==3.5.2
beautifulsoup4==4.11.1
dj-database-url==1.0.0
Django==4.1.3
django-bootstrap4==22.3
django-heroku==0.3.1
gunicorn==20.1.0
psycopg2==2.9.5
soupsieve==2.3.2.post1
sqlparse==0.4.3
whitenoise==6.2.0
These are the most up to date versions at the time of this writing. If you see different versions in your output, you should keep those versions.
Specify the Python runtime
Heroku needs to know what version of Python to use. See the current supported runtimes, and choose the version that most closely matches the version of Python you’re using on your system.
If you don’t know which version you have installed, you can check:
(ll_env)learning_log$ python --version
Python 3.10.8
I’m going to specify Python 3.10.8. Make a file called runtime.txt, and enter the Python version exactly as you saw it on the Heroku page:
python-3.10.8
You should have python in lowercase, followed by a hyphen, followed by the three-part version number.
Modify settings.py for Heroku
Add the following to the end of settings.py:
--snip--
# My settings
LOGIN_URL = 'users:login'

# Heroku settings.
import django_heroku
django_heroku.settings(locals())
This imports the django-heroku package, and modifies some settings that Heroku requires.
Make a Procfile
Make a new file called Procfile, with no file extension.
web: gunicorn learning_log.wsgi --log-file -
This tells Heroku to use gunicorn as a server, and use the settings in learning_log/wsgi.py to launch the app. If your deployment doesn’t work, make sure there’s no hidden file extension on the filename such as Procfile.txt or Procfile.py. Heroku looks for the name Procfile, with no extension.
Use Git to track the project
Git is a source code management tool. Git is used for almost all deployment workflows, because you can make “snapshots” of your projects called commits. If your deployment stops working, you can use Git to revert back to the last working commit of your project, and avoid significant downtime in your projects.
Installing Git
Check if Git is already installed on your system:
(ll_env)learning_log$ git --version
git version 2.30.1
If you need to install Git on Windows or macOS, go to Git’s website to download an installer. On apt-based Linux systems, the command sudo apt install git-all should work.
Configuring Git
If this is the first time you’re using Git, you’ll need to set your username and email:
(ll_env)learning_log$ git config --global user.name "username"
(ll_env)learning_log$ git config --global user.email "username@example.com"
You can use your actual email address, or an address ending in example.com.
Make a .gitignore file
Git shouldn’t track every file in the project, so we’ll write a .gitignore file telling Git which files it doesn’t need to track:
ll_env/
__pycache__/
*.sqlite3
We don’t want to push the virtual environment, Python’s cached files, or the local database. If you’re on macOS, you can add .DS_Store to this file as well.
Make sure you save this file with a dot in front of it; it needs to be called .gitignore, not gitignore. It also can’t have a file ending such as .txt.
Making hidden files visible
Many operating systems “hide” files and folders that begin with a dot. If this is happening:
- On Windows, open Windows Explorer, and then open a folder such as Desktop. Click the View tab, and make sure File name extensions and Hidden items are checked.
- On macOS, you can press
Cmd-Shift-.in any file browser window to see hidden files and folders. - On Linux systems such as Ubuntu, you can press
Ctrl-Hin any file browser to display hidden files and folders. To make this setting permanent, open a file browser such as Nautilus and click the options tab (indicated by three lines). Select the Show Hidden Files checkbox.
Committing the project
Now we’ll commit the current state of the project:
(ll_env)learning_log$ git init
Initialized empty Git repository in /home/eric/pcc/learning_log/.git/

(ll_env)learning_log$ git add .
(ll_env)learning_log$ git commit -am "Ready for deployment to heroku."
[main (root-commit) 79fef72] Ready for deployment to heroku.
 45 files changed, 712 insertions(+)
 create mode 100644 .gitignore
 create mode 100644 Procfile
--snip--
create mode 100644 users/views.py

(ll_env)learning_log$ git status
On branch main
nothing to commit, working tree clean
There are four commands used here:
git initinitializes Git; it sets Git up to track changes in this project.git add .tells Git to start tracking every file in this project that’s not listed in.gitignore.git commit -am "commit_messagetells Git to take a snapshot of the project, and record the given commit message.git statusThis verifies that the commit was successful. When you run this command, you should see the brach you’re currently working on, and the message that there’s nothing to commit and that the working tree is “clean”.
You may see a different main branch name, such as master or trunk.
Pushing to Heroku
We’re finally ready to push the project to Heroku:
(ll_env)learning_log$ heroku login
heroku: Press any key to open up the browser to login or q to exit:
Logging in... done
Logged in as eric@example.com

(ll_env)learning_log$ heroku create
Creating app... done, secret-lowlands-82594
https://secret-lowlands-82594.herokuapp.com/ |
    https://git.heroku.com/secret-lowlands-82594.git

(ll_env)learning_log$ git push heroku main
--snip--
remote: -----> Launching...
remote:        Released v5
remote:        https://secret-lowlands-82594.herokuapp.com/ deployed to Heroku
remote: Verifying deploy... done.
To https://git.heroku.com/secret-lowlands-82594.git
 * [new branch]      main -> main
Three commands were used here:
heroku loginmakes sure you’re logged in through Heroku’s CLI.heroku createcreates an app on Heroku’s servers that you can push code to.git push heroku maintells Git to push your main branch to Heroku.
If your branch was called something different like master, your last command would use that name, ie git push heroku master.
Viewing the deployed project
To view the deployed project, run heroku open. This will open the project in a new browser tab.
Creating a database on Heroku
To create the live database, you need to run the migrate command on the deployed project:
(ll_env)learning_log$ heroku run python manage.py migrate
Running 'python manage.py migrate' on secret-lowlands-82594... up, run.3060
  --snip--
Running migrations:
  --snip--
  Applying learning_logs.0001_initial... OK
  Applying learning_logs.0002_entry... OK
  Applying learning_logs.0003_topic_owner... OK
  Applying sessions.0001_initial... OK
The command heroku run python manage.py migrate tells Heroku to run the migrate command on the server where your project is hosted.
Now you should be able to use the deployed project just as you used it on your local system. Note that the deployed project won’t have any data; we didn’t copy the local database to the live project. Local data is usually test data, so it’s common that the deployed project starts with an empty database.
Creating a superuser on Heroku
You can create a superuser, so you can use the deployed project’s admin site:
(ll_env)learning_log$ heroku run bash
Running 'bash' on secret-lowlands-82594... up, run.9858

~ $ ls
learning_log learning_logs manage.py Procfile requirements.txt runtime.txt
staticfiles users

~ $ python manage.py createsuperuser
Username (leave blank to use ' u47318'): ll_admin
Email address:
Password:
Password (again):
Superuser created successfully.

~ $ exit
exit
The command heroku run bash brings up a terminal session that lets you interact directly with the remote server. Running the command ls lists the files that are available on the remote server. These are the same files we just pushed to the server in the git push heroku main command.
We run python manage.py createsuperuser just like we did in Chapter 18, answer the prompts, and then we have a superuser account that we can use to log in to the admin site on the deployed project. To do this, add /admin/ to the end of the URL for the live app. On this deployment, that URL was https://secret-lowlands-82594/.herokuapp.com/admin/.
Continuing the deployment
At this point, you can return to page 456 in the book, and refine your deployment. The rest of the chapter shows you how to update your project once its deployed. The focus is on making a few important security modifications, and adding custom error pages. You’ll also see how to destroy the deployed version of the project.